
This post may contain affiliate links, meaning, at no additional cost to you, I will earn a commission if you click through and make a qualifying purchase.
In this post, I will teach you how to compost in the simplest and and most affordable way possible. No expensive composting bins or intimidating and complex rules–we’re going to uncomplicate composting. You’ll see that there are only a few easy-to-follow must-do steps involved to get started. It doesn’t have to be hard. So read on, stop throwing compostable materials out with the trash, and start composting with confidence!
I used to be intimidated by the idea of composting. I liked the idea of transforming my kitchen scraps into rich garden soil.
But when I tried to research how to compost, it seemed so complicated and scientific with lots of rules. Oh, there were so many rules!
But then I realized we’re talking about making dirt here–not rocket science!
Experts online will inundate you with information out there about what kinds of materials to add to your compost, what constitutes as green or brown materials, ratios for each type of material to put in and how often, rules for layering green and brown materials, when and how to mix it all together and sometimes move it from one bin to another, how much water to allow in, how much sun or shade during the day, and other special ingredients to add in from time to time for soil quality. The list of complicated rules goes on and on… And there are different sets of rules for different composting strategies.
How could anyone keep up with all of those composting rules?
What if I did it wrong?
If I tried to follow all of those rules when I was just starting out, I was going to get overwhelmed and either never get started or stop after a short time.
But then I realized we’re talking about making dirt here–not rocket science! Things break down into dirt without help all the time. How badly could I really mess it up?
So I decided not to worry about all those rules. Instead, I simplified it down to the most high level ideas of composting. These were the consistent simplest rules that were repeated in every composting technique that I read about.
And guess what? It worked out just fine when I simplified things. I was able to compost successfully, save a lot of organic materials from ending up in the dump, and I have been using the mixture in my garden each year for 6 years now.
Simple and affordable composting works.
If you give it a try, I think you’ll like this lifestyle change because you’ll see that it’s easy to implement, good for the environment, and will also save you some money.
How it’s Thrifty: You don’t have to buy so many bags of dirt for your gardening habit. Instead, you’ll have a free supply of fresh dirt for your gardening. And you’ll need fewer trash bags for taking out the trash. (Our family of 3 humans and 3 cats doesn’t completely fill up a single bag of trash each week. And that’s with one elderly cat on fluids for chronic kidney disease–so we go through a LOT of kitty litter!)
How it’s Green: You will be sending less stuff to the land fill. And you’ll have better soil in your yard.
So what are the simple and affordable composting rules?
If you put compostable materials in a bin and mix it, over time it will become dirt that you can use in your garden.
That’s really all there is to it! No measuring or monitoring.
You just need a bin and you need compostable materials. Then mix it from time to time to speed up the process.
Here’s the simplified details to get you started:
Simple and Affordable Composting Steps for Beginners
Step 1: Set up your compost bin.
In this step, you make and position your container for holding your compost.
You do NOT need to buy an expensive composting bin to compost. I recommend not even looking at them because they cost so much and make you wonder if you need something that fancy. We’re talking $100 on the low end. Though sometimes there are deals like this 43-gallon tumbler for $60:
Really, all you need is an old used garbage can. (I washed a couple of ours with some dish soap and sprayed them with a hose before using them as my bins.) And if you don’t have an old one, you can buy a new one for about $15 at Lowe’s or another hardware store. If you go that route, get a round one so it’s easier to roll it around on the ground when you need to mix the compost. Example: https://www.lowes.com/pd/Creative-Plastic-Concepts-Blue-Hawk-32-Gallon-Black-Plastic-Trash-Can-with-Lid/50396568
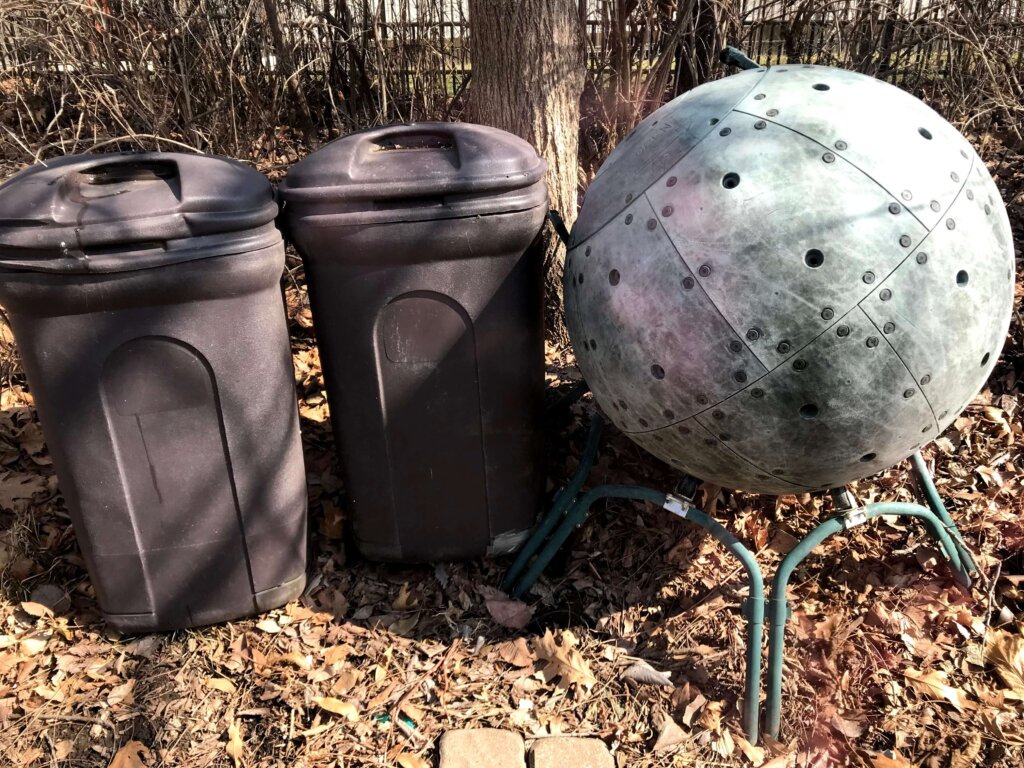
Poke some holes in the sides of your garbage can using your drill. You can use the biggest drill bit that you have–small holes are okay because you don’t want stuff pouring out when you’re rolling to mix your compostable materials.
Keep it simple and affordable.
Don’t worry about how much sun or how much rain your bin is getting. Just make sure your bin is outside and there are some holes so water can get in. If you have sneaky animals around, use a bungee cord to keep the lid on tight. There are work-arounds to make your bins without spending a bundle on your bin.
My bins are in a partly shady spot where I try to keep them out of sight for our neighbors but yet still easily accessible for me. It’s just a few seconds’ walk away from our back door. We’ve never had problems with bugs or smells from our bins within that distance so I don’t worry about them being less than 10 yards from our door.
Step 2: Throw compostable materials into your bin.
In this step, you start filling your bin with all the compostable things that would’ve been wasted before when it went out with the trash. Don’t worry about ratios. Somehow, it works out most of the time without fussing over that.
This is all you really need to remember about compostable materials:
Add green stuff and brown stuff. NO meat stuff allowed.
Frugal Thumb tip: Keep an old empty coffee tin or other small bin with lid by your kitchen sink for easily corralling compostable materials until you’re ready to take them outside. Once it’s full, take your quick trip outside to your big compost bin–for us, that’s about twice a week and as needed.
Green Stuff
These are the wet/fresh compostable materials. They were recently grown and still have moisture in them.
Green stuff includes things like:
- banana peels
- apple cores
- seeds
- fruit or vegetable scraps
- potato peels
- egg shells
- coffee grounds
- weeds that haven’t flowered
- fresh grass clippings
Brown Stuff
These are the dry/old compostable materials.
This includes things like:
- dead leaves
- dried grass clippings
- nut shells
- coffee filters
- cardboard
- paper bags
- shredded paper
- newspaper
- dryer lint
- small twigs
Absolutely No Meat Stuff
These materials will make your compost smell bad, attract bugs and animals, and take longer to decompose. Technically, you can compost these organic materials too, but I wouldn’t recommend it for beginners. These kinds of organic materials require more rules and we’re going for simple here.
Meat stuff includes bones, skin, grease, dairy products, fat, and meat-eaters’ poo like from your pet dogs/cats.
When in doubt, google it!
If you’re unsure if something is considered green or brown compostable material, the internet is your friend. Just search “can I compost fill-in-the-blank?”
If you want a little more background info on greens and browns, recommended ratios, and the reasons behind it, this article is a quick and simple read: Greens and Browns for the Compost Pile (thespruce.com)
Step 3: Turn your bin every few visits.
When you take your compostable kitchen scraps out to your bin, take an extra few seconds to give it a couple turns every other visit or so.
Make sure the lid is on tight, tip it on its side, and roll it around a bit. That helps mix everything together well and aerate your compost so it breaks down faster.
Frugal Thumb Tip: One of the reasons that it’s nice to have at least two compost bins is that you can pick one bin to stop putting your compostable materials into during the winter so you can have some dirt ready in the spring. And in the meantime, you can keep putting your compostable materials in the other bin.
And that’s all there is to it. You should notice the materials breaking down over time and allowing more room for additional compostable materials to be mixed in.
Smile- you have implemented simple and affordable composting for your garden!
Pros and cons of simple and affordable composting
Experts may look at these simplified rules and say that you shouldn’t compost this way because your soil may not be nutritionally balanced and your plants may not grow as well.
The way I look at it, if simplifying the rules gets you to start composting, that’s what matters. It’s worth it. If you want to try more complex rules later, you can, but you’ve got to start somewhere.
And in the meantime, if your plants aren’t growing well and you think it’s the soil, it’s not the end of the world. You can always get a little fertilizer like Miracle Grow:
In that case, you still made dirt–it just might need a little extra help.
But that hasn’t happened to me yet even when following the simple and affordable composting rules that I’ve laid out in this post.
So when both options are successful, I’ll take simple and affordable over complex and expensive any day.
Now you know how I make my own compost simply and affordably– and I make my own mulch too.
Did this post help you get the courage to start composting? Please share in the comments. Or do you already compost? What motivated you to get started originally? Do you follow a lot of rules or keep it simple?
3 comments