
This post may contain affiliate links, meaning, at no additional cost to you, I will earn a commission if you click through and make a qualifying purchase.
It’s crucial to your financial well-being to keep a monthly budget. You’ve got to know what your money is doing so you can tell it what to do. Luckily, it’s never been easier or quicker to create a monthly budget, as you’ll see in this simple 5-step Mint tutorial.
So if you still aren’t keeping a monthly budget, now’s the time to start.
And Mint is the way to get started.
Mint is a free online budget tracker and planner.
I think everyone should be using this free budgeting tool!
It is easy to use and has so many great budgeting features. It’s owned by Intuit so it has legit credibility when it comes to security too.
In fact, Mint is so good that I don’t know how other people still use paper to handle their monthly budgets. If I had to use paper to manually track our money, I would probably have given up on budgeting long ago.
Even if you’ve had some luck with budgeting on paper, do yourself a favor and give Mint a try.
And no, I don’t get paid to say good things about Mint. However, it has definitely paid off to use it.
I’ve been using Mint for nearly 7 years now, and it helped me completely transform my family’s financial trajectory. I was able to cut wasteful spending, pay off all of our loans, and ultimately, afford to quit my job.
In short, using Mint to track our monthly budget was life-changing.
And you can do it too.
All you have to do is follow this simple step-by-step Mint tutorial to get started right now. It’s only 5 steps!
In this Mint tutorial, you’ll learn how to get your monthly budget up and running in a flash. (Seriously, you can do this in less than an hour. And it’s totally free. No excuses!)
Note: It’s a-okay to set this up mid-month. You do not need to wait until the beginning or end of a month to start budgeting. You can immediately start reviewing your spending habits and making plans. In fact, I don’t care what day it is. Get started now!
If you still need some convincing before you get started, read my top 10 reasons you should use Mint: http://frugalthumb.com/top-10-reasons-to-use-mint-for-your-monthly-budget
If I’ve convinced you to start using Mint for your monthly budget (yay!), read on to follow the 5-step Mint tutorial and create your first monthly budget in less than an hour.

Now let’s dive into the Mint tutorial:
Mint Tutorial: Create Your First Monthly Budget
Step 1: Create your Mint account.
Go to Mint.com in a browser on your computer.
You can do this on your phone too, but I recommend initally setting things up on your computer. It has a bigger screen and will be easier to familiarize yourself with the navigation.
You should see a home page similar to the one below. Click the “Sign up Free” button.

Follow the onscreen prompts to create your username and password.
You have now created your free Mint account! And you’ve only 4 steps left to create your first monthly budget on Mint.
So let’s keep going.
Step 2: Link your financial accounts to your Mint account.
Now it’s time to allow Mint to pull in copies of all your transactions. To start off, I recommend linking your bank account(s). Your bank accounts will give you the most complete overview of your finances without needing to add everything else yet. You can add credit cards, loans, and retirement accounts as you have time.
While logged into Mint.com, click on the “Add Accounts” menu option at the top of the screen (as shown in the image below).

The following “Find your account” screen will pop up:
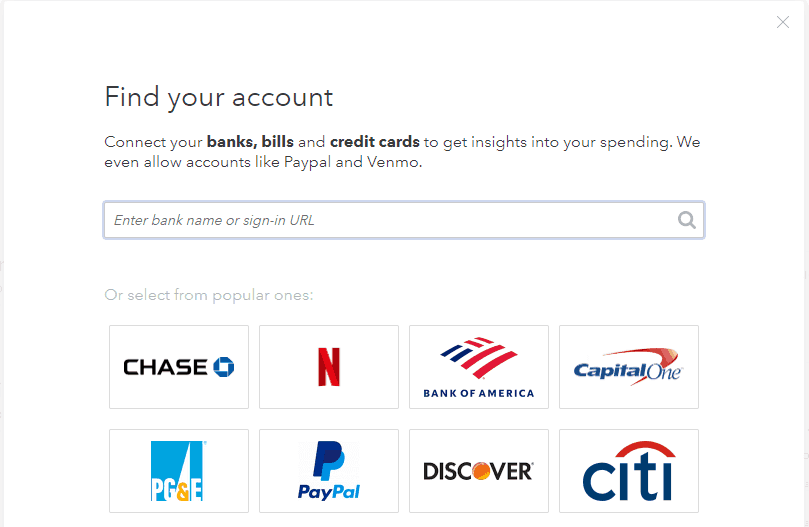
Type in the name of your bank and hit enter to search for it. A list of search results will display.
If it’s not showing up in the search results, try searching by your bank’s website sign-in URL.
Once you’ve found your account, select it from the list.
Then Mint will walk you through the steps to link your account, so it can start pulling in your transactions.
It will require your usernames and passwords, so be sure to have those handy.
One of the nice things about Mint is that it will pull in your past spending information, credits and debits, up to 3 months.
Because of that, you’ll be immediately starting out with your past transactions at your fingertips- not just ones from the day you set up Mint and forward. So you can hit the ground running and see your spending habits from last month, which will help you with your budget estimates for your first monthly budget in Mint.
It may take a few minutes to a few hours to populate with your transactions, so while you wait, continue adding your financial accounts.
Repeat this step with all of your bank accounts, credit cards, and other financial institutions.
Step 3: Create your budget.
While Mint is working on copying your transactions from the accounts you linked in the last step, you are going to set up your first monthly budget.
Select the “Budgets” link in the navigation bar at the top of the screen:

There will be a button to “create a budget”. You will use this button to add every category that you need to your budget.
Every category in your budget will be income or expenses.
The categories available in Mint are listed in the image below.
Note: There are subcategories built into Mint as well. If there’s a category that you want to use and don’t see in the list, you can also create your own custom categories!
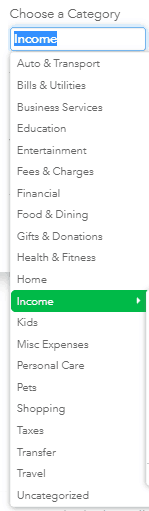
Start with the Income category.
Estimate how much income you expect to receive this month. Look up your family’s last two month’s of paycheck stubs if you need to. Whatever you tell Mint that you expect for your monthly income is what it will use to calculate whether you’re staying within your budget for your expenses.
Then add your Expenses categories.
The expense categories are all of the other categories in the list. Look through each category and determine whether to add it to your monthly budget.
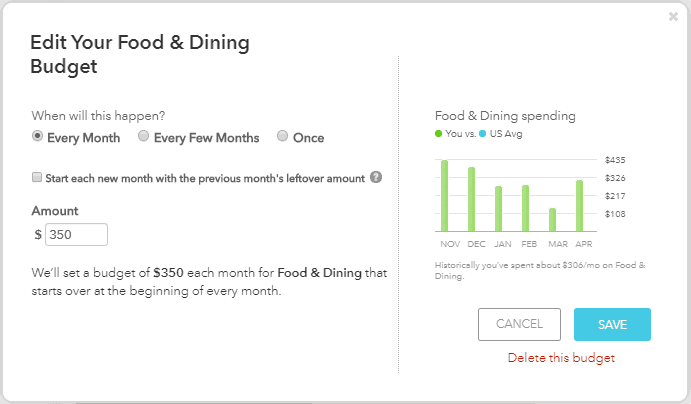
Estimate a dollar amount for every category that you add to your monthly budget and how often you expect to have that spending. Will it be every month, every few months, just one time?
Here’s an example of what the screen looks like when you’re adding a budget category:
When you have finished this step, be sure to compare your estimated income with your estimated expenses for your budget categories. If your total estimated spending across all categories is more than your total estimated income, try to change some of those numbers until expenses are less than income.
Step 4: Review and categorize your transactions.
At this point, you’ve created your Mint account, linked your other financial accounts, and set up your first monthly budget- complete with categories and estimated spending limits.
Now it’s time to see if Mint has populated with your transactions from your linked accounts!
Click on the “Transactions” link in the navigation bar:

You should see a lot of transactions.
This is exciting, especially when you think about how long it might’ve taken to collect all of this information yourself.
If not, wait a few more hours and check again.
If you do see transactions, you are now going to go through these one by one to make sure they are associated to the appropriate budget category that you designated in the previous step.
Click on the first transaction in the list to view the details.
You’ll see a drop down where you can change the category. If you change the category and you know this type of transaction should always be categorized this way, you can check the “Rules” checkbox to tell Mint to always apply that category for you.
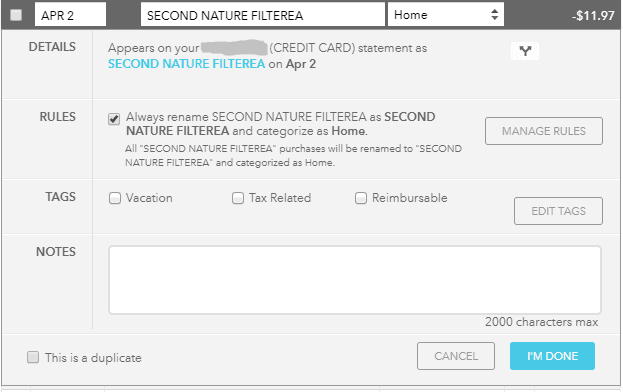
When you’re done making changes, click “I’m Done.”
Repeat this with every transaction that needs a category change in your list.
Now that you’re done applying the appropriate categories to your transactions, it’s time to move on to the last step of this Mint tutorial.
Step 5: Check on your budget totals.
Go back to the “Budgets” link in the navigation bar at the top of the screen.
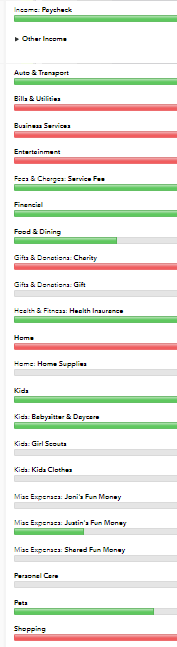
Since your transactions are now categorized, your budget should show how much you’ve spent and how much you still have available for every category.
Congratulations! You are officially looking at your first monthly budget in Mint!
How does it look?
The bar chart is green for categories that are still on track, yellow when you’re getting close to going over budget, and red when you’ve spent more than you planned.
Here’s an example of what you might see:
Now you can tweak the spending amounts in your categories as needed.
For example, if you have some categories that are already yellow or red, find another category that can be lower so you can move your amounts around and make it work.
You can also begin to understand your current spending habits and how you might be able to change them in the future.
Check in with your monthly budget at least every week on Mint to stay on track.
If you need tips on saving in any budget category, check out the frugal thumb budgeting quick links.
Budgeting is the difference between you controlling your money versus it controlling you.
And you’ve just taken the first steps to be in charge of your financial life.
I hope this Mint tutorial has shown you how easy it can be to set up and keep a monthly budget.
You’ve got this!
2 comments