This post may contain affiliate links, meaning, at no additional cost to you, I will earn a commission if you click through and make a qualifying purchase.
This spring has been a whirlwind of projects in the backyard! From adding a patio walkway and making outdoor rugs to planting a vegetable garden and setting up our patio furniture, I’ve been getting my outdoor oasis ready.
Are you taking advantage of the lovely weather and getting outside to enjoy it?
Speaking of which, how is your patio furniture looking this spring?
A big part of enjoying your outdoor space is impacted by the seating area.
Sometimes winter is not too kind to outdoor furniture. I did not invest in patio chair covers for the past few winters and… it showed!
Our patio chairs shouted, “Do not sit on me because I look gross!” They were originally a plain tan color when we bought them about a decade ago (not particularly interesting or exciting). And the seats had become stained and discolored with rusty spots on the metal arm rests and legs. Bleck. ?
But, when you’re trying to be thrifty and green, it’s hard to justify throwing out perfectly usable chairs and spending hundreds of dollars on new ones.
They’d end up in a landfill and my budget would be busted. So, I needed to find a win-win solution: it was time to attempt a DIY outdoor patio chair makeover!
Most blog posts that I found online had directions for spray painting patio furniture. Which is great! Buuut…
Spray paint can get a little expensive if you need multiple cans.
And if you have multiple chairs, you WILL need multiple cans of spray paint.
As for me, I had 6 patio chairs that I wanted to fix up.
Instead of spray paint, I wondered if I could use regular paint on the patio chairs and still get a nice finished look… so I decided to try it. And boy, was I happy with the results!
You really can use regular paint to give your patio chairs a makeover!
I had some leftover blue and white paint cans from other projects in our garage.
Then I got to work. And with all the rain we’ve had this spring, using regular paint had the added bonus that I could do this project in the garage (with the garage door open for ventilation) and didn’t have to wait for nicer weather.
That would’ve been dangerous with spray paint – with it spraying everywhere and all.
If you’re interested in adding some pizazz to your old and tired patio furniture, read on for simple instructions to use regular paint and do it yourself.

I ended up spending nothing on this project because I used supplies that I already had on hand.
Supplies Needed for DIY Outdoor Patio Chair Makeover
- Paint (great way to use up leftover paint from other projects)
- Paint brushes
- Stencil (optional)
- Painter’s tape (optional)
- Sand paper
- Putty knife
- Fabric Defense spray
Frugal Thumb Tip: If you need to buy paint, check out the clearance section in the paint aisle at Lowe’s. I am always finding great deals on mis-tints there. We’re talking 50% off the 50% off price. It’s not unusual for me to get a gallon of paint for $7 or less.
In my case, I used a cheap can of blue paint from Lowe’s (exterior acrylic) and a leftover can of white paint that I had on hand (interior acrylic latex):

Here is a photo showing how stained and ugly the chairs had gotten (on the left) and what I started doing for the makeover (on the right):

You can see what I mean that it wasn’t the most inviting place to sit. There really wasn’t anything wrong with the chair per se, but those weathered stains made it look yucky.
So, without further ado, this is how you go from rusty and stained to bright and like-new.
Instructions for DIY Outdoor Patio Chair Makeover
Step 1: Gather your supplies.
Think about what you already own before buying anything. Do you already have leftover paint? Odds are you like the colors you have so why not try it on your patio chairs?
Frugal Thumb Tip: If you want to save on painter’s tape, you can use half as much by waiting for one chair to dry, then removing the tape carefully and sticking it to the next chair you want to paint. I can often re-use the tape once or twice.
Step 2: Remove peeling paint and sand down rusty spots.
Take a close look at each chair and find any peeling paint or rusty spots. Wherever the paint is peeling, use the putty knife to scrape as much of it away as you can. Really get under there. Then use the sand paper to smooth down the paint edges and rusty spots.

Step 3 (optional): Wash off the chair.
You want to make sure there’s not caked dirt, dust, rust, or other yard debris stuck on the chair. You can spray it with a hose or just wipe it off good with an old towel.
I personally just used an old towel to wipe off dirt and dust.
Step 4 (optional): Tape the chair.
If there is any area that you don’t want to paint or will be painting a different color, tape it off with your painter’s tape now.
For example, on 4 of my chairs, I didn’t want to paint the metal frames so I used tape to keep the lines clean. For my other 2 chairs, I just painted the whole thing one color- seat, frame, and all.
I’ve also seen examples of stripes, zigzags, and other various designs created with tape. The possibilities are endless. Have fun with it!

Step 5: Paint!
Let your creative juices flow. There are endless possibilities here too. I decided to make some of my chairs white with blue stenciled flowers. And then I swapped it on others by painting some chairs blue with white stenciled flowers.
Go light on the paint and then add layers. Once you’ve painted each coat, reassess the situation. How is the chair looking? Would another coat help even out the color?
If you try to paint it on thickly, the paint will ooze through to the other side of the chair and cause a drippy mess. Since we’re using regular paint and not spray paint, painting lightly is important to avoid goopy glumpy or pooling paint on the chairs. The paint required two- three coats on my chairs.
Frugal Thumb Tip: If you use a stencil on your chairs, it’s that much more important to apply the paint thinly and then layer, in order to avoid color seeping through to the other side of the chair. When this inevitably happened to me, I used smaller paint brushes to touch up.
Step 6: Wait for the paint to dry.
After every coat, wait for the paint to dry. It was hard for me to be patient in between coats, but it’s important to let it dry. Otherwise, when you go to add a different color of paint with a stencil over the top, you’ll get smearing and color bleeding.
Frugal Thumb Tip: You don’t have to wash your paint brushes between each coat. Instead, save your paint brushes in between coats (and even overnight) by wrapping with aluminum foil when not in use. Then you only have to wash them once, when your project is done.
Step 7: Remove the painter’s tape.
Admire how good your chair is looking now! There’s only one step left to protect your hard work from mother nature.
Step 8: Spray with Fabric Defense.
I’m gonna be honest. There’s probably a better spray to use for your finishing layer on the chairs, but I had this on hand. So that’s what I used. We’ve had a lot of storms this spring, and so far, the paint is holding up perfectly!
In conclusion, you can see that spray paint isn’t your only choice when painting/ transforming your old stained patio furniture. You can use regular paint to make your project even cheaper and still get great results!
If you hate how your patio chairs are looking and don’t want to shell out a bunch of money to buy new, at least give this a try.
If you don’t like it, you can always get rid of your chairs then. But there’s nothing to lose and everything to gain by attempting this “trash to treasure” DIY outdoor patio chair makeover!
Look at these results:
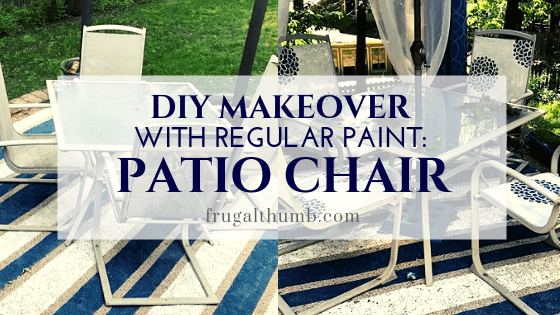
My tan patio chairs are now white with big blue flowers!

And my 2 smaller patio chairs are blue with white flowers.

I just love the color this has added to our outdoor living space!

If you give this DIY outdoor patio chair makeover a try, be sure to let me know how it goes! I love seeing before and after photos for DIY projects!
Yours frugally,
Joni ?
4 comments
Hi there – excited to try this. What type of paint did you use – interior? Exterior? Was it water based latex? Thank yoy?
That’s a great question! Sorry for the delayed answer- I had to rummage through my paint shelf in the garage to find the right cans. 😉 The white paint was a satin interior acrylic latex and the blue was a semigloss exterior acrylic paint. I wanted to send you pictures of them, but I can’t add photos to comments so I’m going to update the post to include this info. Thanks for the question, Dawn!
Love this idea! Looks gorgeous. Does the paint fad or chip ? I want to do this, my patio is sun light 24-7
Thank you! I’ve had these chairs outside now for over a year so I can honestly say that the paint didn’t fade or chip. They still look really good. There were a couple of spots where I didn’t file down / peel off the rusty old paint as well as I should have and those spots are a little bit peeled, but it hasn’t been enough that I’ve felt the need to do a touch-up yet. My chairs are in a partial shade location though too so I’m not sure about full time direct sunlight. But the project is cheap enough that I’d definitely give it a try before buying new chairs! You may be pleasantly surprised. I don’t recommend this project if you’re painting wooden chairs-those will peel a lot if you follow this tutorial. But for the fabric and steel frame patio chairs, it worked great!